How to Photograph Your Artwork
Taking a good photo of your artwork is simpler than you might think, and getting it right makes a real difference to how your work looks to your tutor and on our website. Here are our top tips.
Lighting
Lighting is the single most important factor in a good artwork photo. The best option is natural daylight, so if you can, find a spot near a window on a bright but overcast day. Soft, indirect light is ideal as it illuminates your artwork evenly without creating glare or harsh shadows. Avoid direct sunlight falling on the work as it can wash out colours and cause reflections, especially on works behind glass or with any kind of varnished or glossy surface.
If you are working in the evening or in a room without good natural light, try using two lamps placed either side of your artwork at roughly 45 degrees. This helps spread the light evenly across the surface. Avoid using your camera or phone flash as this almost always creates a bright hotspot in the centre of the image.
Whatever you do, try not to mix different types of light, for example a window on one side and a lamp on the other, as this can create uneven colour casts that are difficult to correct afterwards.
Positioning your artwork
Place your artwork flat on the floor or lean it against a plain neutral wall. Position yourself directly in front of it, with your phone or camera parallel to the surface, not at an angle. Shooting at an angle causes distortion and makes the edges of the artwork appear to lean or skew.
Make sure the artwork fills as much of the frame as possible, so that when you take the photo there is very little background or surroundings visible. The artwork should be the whole picture.
If you are using a phone, use the grid feature to help you keep everything straight and level. You might also find it helpful to set a timer so that you can hold the phone steady without the slight movement that comes from pressing the shutter button.
Using your smartphone
Modern smartphones take excellent photos and are perfectly suited for photographing artwork. A few tips specific to phone cameras:
- Clean your camera lens before you start, as smudges and dust can soften the image.
- Tap the screen on your artwork to make sure the camera focuses on it rather than the background.
- Avoid using digital zoom, as this reduces quality. Step closer to the artwork instead.
- iPhone users may find Portrait Mode useful as it keeps the subject sharp and minimises background distraction.
- After taking the photo, use your phone's built-in editing tools to check the brightness and colour look true to life. Small adjustments to exposure and colour balance can make a real difference.
Before you photograph
Give your artwork a quick check before you start. Remove any dust or smudges from the surface, and if it is behind glass, remove the glass if you can to avoid reflections. Make sure the background behind or beneath your artwork is clean and neutral, ideally a plain floor, table or wall with nothing distracting in shot.
What a good image looks like: a perfect example
Not sure if your photo is good enough? Take a look at the image below by London Art College student Philip Hatter, and use it as your guide.
This is exactly what we are looking for. The painting fills the entire frame with no distracting backgrounds, mounts or furniture visible. It is photographed straight on from directly above, so there is no distortion or angle. The image is sharp and in focus throughout, and there is no glare or shine on the surface. The file itself is 1.1mb and 934 x 1280 pixels, a perfect size for submitting to your tutor or entering the competition.
If your photo looks like this, you are good to go! If it looks darker, blurry, or you can see the edges of a table or floor around it, it is worth taking it again. A little extra care at this stage makes a real difference to how your work is received and displayed.
You can right-click the image and check its properties to see the file size and pixel dimensions for yourself, which is a handy way to check your own images are a similar size.
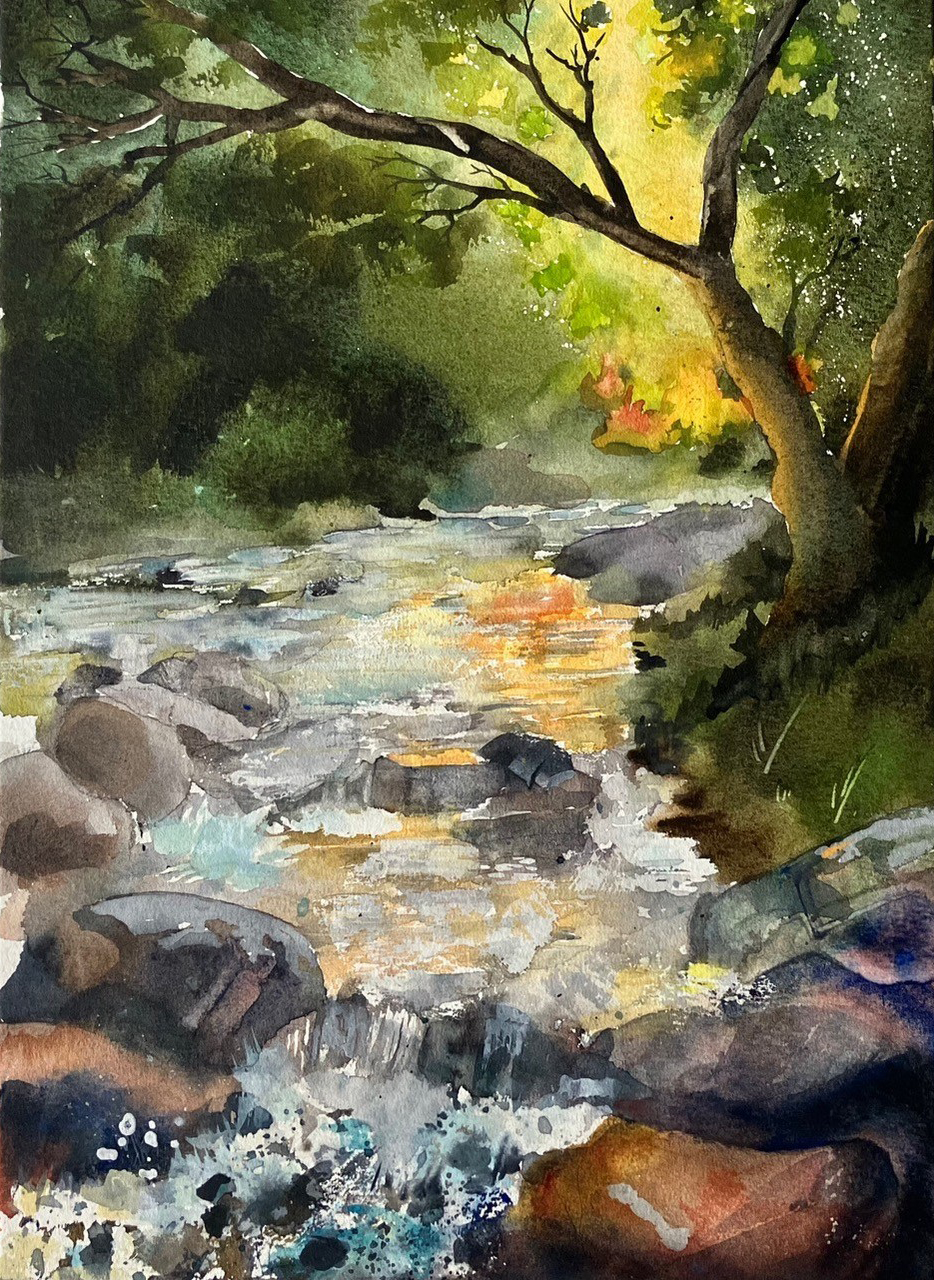
Image: Philip Hatter, London Art College student.